Page 1 :
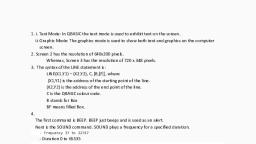
In the chapter, Using graphics, •SCREEN Command, • COLOR command, LINE command, •CIRCLE command, QBASIC: Graphics and, sounds, Using sounds, QBASIC can be used to draw figures and diagrams. You can draw different shapes, such as, line, square, circle and so on. You can also fill in different colors in these shapes., The computer screen is made up of hundreds of picture elements, (very small dots) called pixels. The number of pixels horizontally, and vertically determines the resolution of the monitor. Higher the, resolution, better is the quality of picture display., Using graphics, QBASIC has two modes: text mode and graphics mode. The text mode is used to display, text on the screen. The graphics mode is used to display both text and graphics on the, computer screen., A computer screen is divided into 25 rows (horizontal) and 80 columns (vertical). The, top-left corner of screen is addressed as (1,1) which means first column and first row. The, bottom-right corner of screen is addressed as (80,25) which means eightieth column and, twenty-fifth row., When you start QBASIC, by default, the program uses text mode. In order to draw graphics,, the screen mode has to be changed to graphics mode., V Table 5.1 Various screen modes in QBASIC and their use, SCREEN command, The SCREEN command is used to, Mode, Used for, change to the different screen, modes available in QBASIC., SCREEN O, Text Mode, SCREEN 1, Graphics Mode with 320 x 200 pixels, Table 5.1 shows the various screen, modes and when they are used., SCREEN 2, Graphics Mode with 640 x 200 pixels, The syntax of the SCREEN, command is: SCREEN <Mode>, where <Mode> is the screen, SCREEN 7, Graphics Mode with 320 x 200 pixels, SCREEN 9, Graphics Mode with 640 x 350 pixels, SCREEN 12, mode number., Graphics Mode with 640 x 480 pixels, SCREEN 13, Graphics Mode with 320 x 200 pixels
Page 2 :
The SCREEN o command is used to return to the default text mode, and has 16 colors., The SCREEN 1 command is generally used for medium-resolution graphics mode., The SCREEN 2 command is generally used for high-resolution graphics mode., The SCREEN 12 command is generally used for the highest resolution., The SCREEN 13 command is most used as it has 256 colors., COLOR command, QBASIC uses color codes for different colors. The list of common color codes understood, by QBASIC are listed in Table 5.2., V Table 5.2 Color codes and their names in QBASIC, Color code, Color name, Color code, Color name, Black, 8., Grey, Blue, 6., Light Blue, Green, 10, Light Green, 3, Сyan, Light Cyan, 11, 4, Red, Light Red, 12, Magenta, 13, Light Magenta, 6., Yellow, 14, Light Yellow, White, 15, High Intensity White, The COLOR command is used to define the background and foreground colors for the, graphics., The color statement can be used as:, Color <foreground color>, <background color>, This can be seen in the following examples., EXAMPLE 5.1 CLS, COLOR 2, PRINT "GREEN", END, The COLOR Command in Example 5.1, the color of the text to be green, define, as 2 is the code for green color. QBASIC, will display the text "GREEN" in green, color on the screen as shown in Figure 5.1., A Fig. 5.1 Output of Example 5.1, Let's modify the above example by providing a value for the background also., 59, QBASIC Graphics and sounds
Page 3 :
EXAMPLE 5.2 CLS, COLOR 2, 4, Print "Green Text on Red Background", END, This program will display, green-colored text on a red-colored, A Fig. 5.2 Output of Example 5.2, background as shown in Figure 5.2., LINE command, The LINE command is used to draw a line between two points. The points are defined, in (x,y) format. The syntax of the LINE statement is as follows:, LINE (X1,Y1)-(X2,Y2),C,B or LINE (X1,Y1)-(X2,Y2),C,BF, where, • (X1,Y1) is the address of the starting point of the line., • (X2,Y2) is the address of the end point of the line., Remember that, X1 and X2 are the column numbers, whereas Y1 and Y2 are the row, numbers., •C is the QBASIC color code. If you do not mention any color code, then computer, will take default color code here., B stands for Box. It is used to draw an empty rectangle with X1,Y1 and X2,Y2 as, diagonally opposite corners of the rectangle., • BF means Filled Box. It is used to draw a filled rectangle with X1,Y1 and X2,Y2 as, diagonally opposite corners of the rectangle., EXAMPLE 5.3 CLS, SCREEN 9, LINE (20,15)-(90,90), 10, END, The program in Example 5.3 draws, a green line from coordinates 20,15 to, 90,90 as shown in Figure 5.3., EXAMPLE 5.4 CLS, A Fig. 5.3 Output of Example 5.-3, SCREEN 9, LINE (20,15)-(90,90), 10,BF, END, The program in Example 5.4 draws, a rectangle filled with green color, from the coordinates 20,15 to 90,90, as shown in Figure 5.4., A Fig. 5.4 Output of Example 5-4, 60, QBASIC Graphics and sounds
Page 4 :
EXAMPLE 5.5 CLS, SCREEN 12, CLS, LINE (0,0)-(320, 240), 15, The program in Example 5.5 will draw, a line (Fig. 5.5) starting at coordinate (o,, o), which is the upper-left corner of the, screen and ending at (320,240), which is, the center of the screen. The number 15, defines the color code for bright white., A Fig. 5.5 Output of Example 5.5, smart, TIP, SER, Fact box, To draw a vertical line, keep the column coordinate, same for both X1 and X2 and differ the row coordinates., For example, LINE (40,60)-(40,100),5., Similarly, to draw a horizontal line, keep the row, coordinate same for both Y1 and Y2 and differ the, column coordinates. For example, LINE (30,70)-,70),11., END statement can be considered, optional to write in small and, simple program. Its necessity, increases with the complicity of, program as it denotes the point, where the program stops., Class Activity, A. Write T for True or F for False. Rewrite the false statements correctly., 1. The LINE statement lets you draw a curved line between the given three points., 2. In the COLOR statement, the color code can be o or 1., 3. SCREEN 1 is the default mode of QBASIC., 4. When you start QBASIC, by default, the program uses text mode., B. Given are some commands that will show a Graphic as output. Clearly explain, the type of line or rectangle (big or small) and the color., 1. LINE (30,50)-(50,30), 12, 2. LINE (130,250)- (130,330), 10, 3. LINE (200,120)-(350,230),3, 4. LINE (190,130)-(200,120),7,BF, 5. LINE (300,30)-(200,30),5, 61, QRASIC Graphic and sounds
Page 5 :
CIRCLE command, The CIRCLE COmmand is used to draw a circle or ellipse in QBASIC. You need to define, the coordinates of the centre, the radius of the circle and the color., The syntax of the CIRCLE command is as follows:, CIRCLE (X,Y),R,C,SA,EA, where, (X,Y) are the coordinates of the centre of the circle., R is the radius of the circle., C is the color code. It is optional., • SA is the starting angle. Use it if you want to draw an arc., EA is the ending angle of the arc., EXAMPLE 5.6 SCREEN 12, CLS, CIRCLE (320,240), 100,15, In Example 5.6, the coordinate (320,240) tells the computer where to put the center, of the circle; 100 is the radius, or how big the circle will be; and 15 is the color number, for bright white. The circle that appears on your screen will be similar to the one shown, in Figure 5.6. The circle shown was not filled in, it just has outline., 1 DIVERSON-AATNAS- -Oo0nQ ODE, A Fig. 5.6 Output of Example 5.6, PAINT command, The paint command is used to fill an area with the specified color. The syntax of the, Paint command is as follows:, PAINT (X,Y),C, where, • (X.Y) are the coordinates which tell the computer about from where to start, color fill., C is the color code., 62, QBASIC Graphics and sounds